1. 前言

Spring的重要性毋庸置疑,前前后后也花了很多心思去学习,包括极客时间上的小马哥的课程,丁雪峰的玩转Spring全家桶,Spring编程常见错误50例。
此外,还学习了刘欣的《从零开始造Spring》,以及Spring官方文档。今天对所学习的内容进行比较系统的总结。
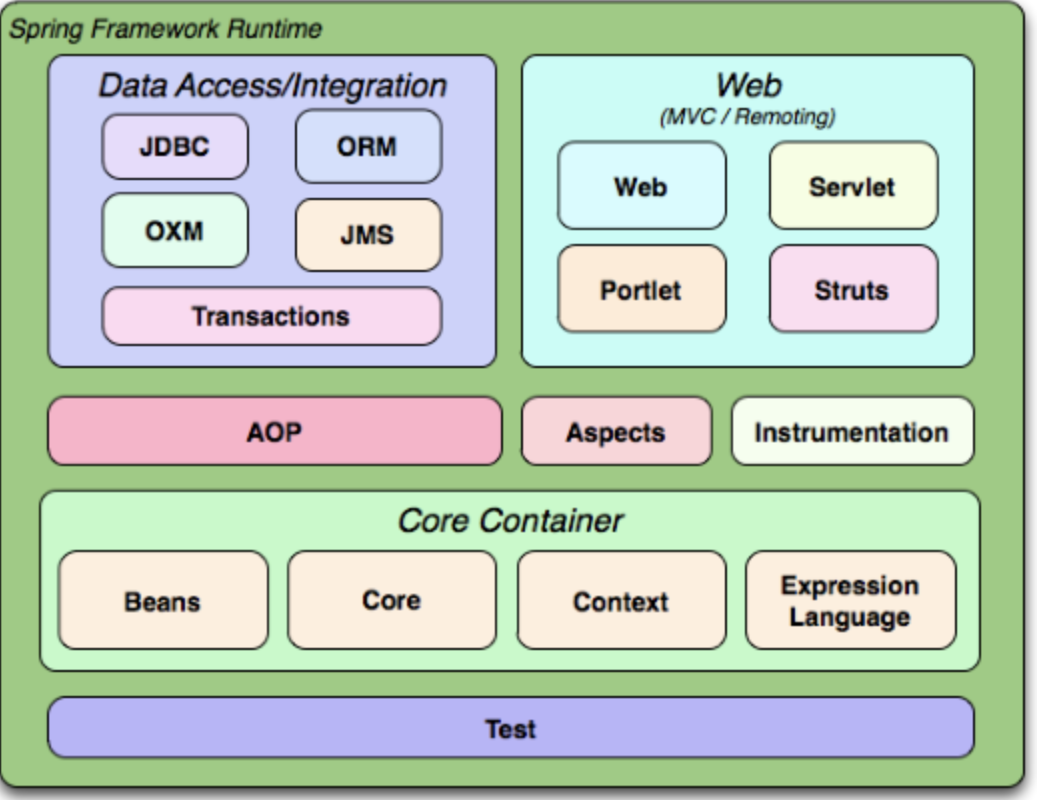
我们大体上可以把Spring技术分为核心特性和Web技术。
这篇文章我们主要讨论核心特性。
2. 核心特性
dependency injection, events, resources, i18n, validation, data binding, type conversion, SpEL, AOP.
Spring最为核心的特性是IoC和AoP。围绕这两者会有大量的面试题目。
这两个概念不在赘述。
2.1 IoC
2.1.1 容器是什么
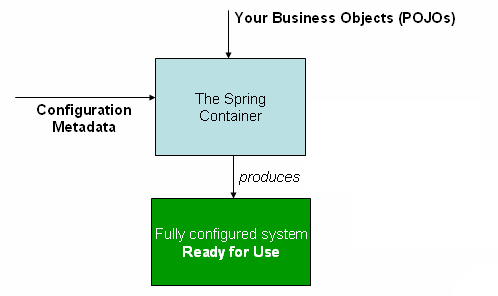
IoC容器用来管理我们的Bean。根据我们配置的信息来实例化和组装Bean。

我们可以基于xml来进行配置,注解和Java类来进行配置。
先来看基于XML的配置:
<?xml version="1.0" encoding="UTF-8"?>
<beans xmlns="http://www.springframework.org/schema/beans"
       xmlns:xsi="http://www.w3.org/2001/XMLSchema-instance"
       xsi:schemaLocation="http://www.springframework.org/schema/beans
           http://www.springframework.org/schema/beans/spring-beans.xsd">

    <bean id="petStore"
          class="org.litespring.service.v2.PetStoreService">

        <property name="accountDao" ref="accountDao"/>
        <property name="itemDao" ref="itemDao"/>
        <property name="owner" value="hjs"/>
        <property name="version" value="2"/>
    </bean>

    <bean id="accountDao" class="org.litespring.dao.v2.AccountDao">
    </bean>

    <bean id="itemDao" class="org.litespring.dao.v2.ItemDao">
    </bean>

</beans>
再来看基于注解的配置,这个和xml本质上是类似的,其中@Component注解描述了该类需要被实例化,@Autowired注解描述了两个类之间的依赖关系。
<?xml version="1.0" encoding="UTF-8"?>

<beans xmlns="http://www.springframework.org/schema/beans"
       xmlns:xsi="http://www.w3.org/2001/XMLSchema-instance"
       xmlns:context="http://www.springframework.org/schema/context"
       xsi:schemaLocation="http://www.springframework.org/schema/beans
         http://www.springframework.org/schema/beans/spring-beans.xsd
         http://www.springframework.org/schema/context
         http://www.springframework.org/schema/context/spring-context.xsd">

    <context:component-scan base-package="org.litespring.service.v4,org.litespring.dao.v4">

    </context:component-scan>
</beans>


import org.litespring.dao.v4.AccountDao;
import org.litespring.dao.v4.ItemDao;
import org.litespring.stereotype.Autowired;
import org.litespring.stereotype.Component;

@Component(value = "petStore")
public class PetStoreService {
    @Autowired
    private AccountDao accountDao;
    @Autowired
    private ItemDao itemDao;

    public AccountDao getAccountDao() {
        return accountDao;
    }

    public ItemDao getItemDao() {
        return itemDao;
    }
}
和@Component相似的注解有@Repository,@Service和@Controller。和@Autowired相似的注解有@Primary,@Qualifier,@Resource。
最后再来看基于Java类配置,定义Bean信息,类标注@Configuration注解注解,方法标注@Bean注解。
// 1.将一个POJO标注定义为Bean的配置类
@Configuration
public class AppConf {
    // 2.以下两个方法定义了两个Bean,并提供了Bean的实例化逻辑
    @Bean
    public UserDao userDao() {
        return new UserDao();
    }
    @Bean
    public LogDao logDao() {
        return new LogDao()
    }
    @Bean
    public LogonService logonService() {
        LogonServcie logonService = new LogonService();
        // 将上面2处定义的Bean注入到logonService的Bean
        logonService.setLogDao(logDao());
        logonService.setUserDao(userDao());
        return logonService;
    }
}
等价于:
<bean id="userDao" class="com.hhxs.bbt.dao.UserDao" />
<bean id="logDao" class="com.hhxs.bbt.dao.LogDao" />
<bean id="logonService" class="com.hhxs.bbt.conf.LogonService"
    p:logDao-ref="userDao" p:userDao-ref="logDao" />
启动Spring容器有2种方式:
// 第一种方式,通过AnnotationConfigApplicationContext
import org.springframework.context.ApplicationContext;
import org.springframework.context.annotation.AnnotationConfigApplicationContext;
public class JavaConfigTest {
    public static void main(String[] args) {
        ApplicationContext ctx = new AnnotationConfigApplicationContext(AppConf.class);
        LogonService logonService = ctx.getBean(logonService.class);
        logonService.printHello();
    }
}
// 第二种方式,通过register函数
import org.springframework.context.ApplicationContext;
import org.springframework.context.annotation.AnnotationConfigApplicationContext;
public class JavaConfigTest {
    public static void main(String[] args) {
        AnnotationConfigApplicationContext ctx = new AnnotationConfigApplicationContext();
        // 注册多个@Configuration配置类
        ctx.register(DaoConfig.Class);
        ctx.register(ServiceConfig.class);
        // 刷新容器以应用这些注册的配置类
        ctx.refresh();
        LogonService logonService = ctx.getBean(logonService.class);
        logonService.printHello();
    }
}
总结,他们之间的区别如下:
| – | 基于XML配置 | 基于注解配置 | 基于Java类配置 |
|---|---|---|---|
| Bean定义 | <bean class="com.hhxs.bbt.UserDao"> |
Bean实现类出通过标注 @Component、@Repository、@Service、@Controller | 在标注了@Configuration的Java类中,通过在类方法上标注@Bean定义一个Bean。方法必须提供Bean的实例化逻辑。 |
| Bean名称 | 通过的id或name属性定义 | 通过注解的value属性定义,如@Component(“userDao”)。默认名称为小写字母打头的类名(不带包名):userDao | 通过@Bean的name属性定义,如@Bean(“userDao”),默认名称为方法名。 |
| Bean注入 | 通过子元素或通过p命名空间的动态属性 | 通过在成员变量或方法入参出标注@Autowired,按类型匹配自动注入 | 可以通过在方法处通过@Autowired使方法入参绑定Bean,然后在方法中通过代码进行注入,还可以通过调用配置类的@Bean方法进行注入 |
| Bean生命过程方法 | 通过的init-method和destory-method属性指定Bean实现类的方法名。最多只能指定一个初始化方法和一个销毁方法 | 通过在目标方法上标注@PostConstruct和@PreDestroy注解指定初始化或销毁方法,可以定义任意多个方法 | 通过@Bean的initmethod或destoryMethod指定一个初始化或销毁方法。 |
| Bean作用范围 | 通过的scope属性指定 | 通过在类定义出标注@Scope指定 | 通过在Bean方法定义处标注@Scope指定 |
| Bean延迟初始化 | 通过的lazy-init属性指定,默认为default,继承与的default-lazy-init设置,该值默认为false | 通过在类定义处标注@Lazy指定,如@Lazy(true) | 通过在Bean方法定义处标注@Lazy指定 |
上面我们配置了Bean的关系,我们可以通过ApplicationContext来实例化容器,进而通过context.getBean方法来获取到Spring装配的Bean。
2.1.2 Bean到底是什么
说了这么多,Bean到底是啥呢?
BeanDefinition是Spring抽象出的一个很重要的类,包含下面的元信息:
- 类的全限定名,是实现类,而不是抽象类或者接口,因为二者不能被实例化;
- 作用域,生命周期等;
- 依赖,就是其他的相关Bean;
- 。。。
具体的参考下面的。
| Property | Explained in… |
|---|---|
| Class | Instantiating Beans |
| Name | Naming Beans |
| Scope | Bean Scopes |
| Constructor arguments | Dependency Injection |
| Properties | Dependency Injection |
| Autowiring mode | Autowiring Collaborators |
| Lazy initialization mode | Lazy-initialized Beans |
| Initialization method | Initialization Callbacks |
| Destruction method | Destruction Callbacks |
另外一个重要的知识点是Bean的名字,需要注意bean的id和name属性。java.beans.Introspector.decapitalize是bean的命名的实现。此外,我们还可以给bean取别名。
Bean的实例化,有以下几种方法:
<bean id="clientService"
    class="examples.ClientService"
    factory-method="createInstance"/>

public class ClientService {
    private static ClientService clientService = new ClientService();
    private ClientService() {}

    public static ClientService createInstance() {
        return clientService;
    }
}
<!-- the factory bean, which contains a method called createInstance() -->
<bean id="serviceLocator" class="examples.DefaultServiceLocator">
    <!-- inject any dependencies required by this locator bean -->
</bean>

<!-- the bean to be created via the factory bean -->
<bean id="clientService"
    factory-bean="serviceLocator"
    factory-method="createClientServiceInstance"/>

public class DefaultServiceLocator {

    private static ClientService clientService = new ClientServiceImpl();

    public ClientService createClientServiceInstance() {
        return clientService;
    }
}
2.1.3 依赖:Bean之间的协同关系
单个Bean不可能组成复杂的应用。
先来看依赖注入。
它是为给定代码提供资源的过程。
有2种实现,分别是基于构造函数和Setter方法。
先来看前者,在简单的情况下,是没问题的。
public class ThingOne {

    public ThingOne(ThingTwo thingTwo, ThingThree thingThree) {
        // ...
    }
}

<beans>
    <bean id="beanOne" class="x.y.ThingOne">
        <constructor-arg ref="beanTwo"/>
        <constructor-arg ref="beanThree"/>
    </bean>

    <bean id="beanTwo" class="x.y.ThingTwo"/>

    <bean id="beanThree" class="x.y.ThingThree"/>
</beans>
在更多数情况下,Spring无法准确的判断出我们的参数的顺序的,上面的写法是有歧义的。
public class ExampleBean {

    // Number of years to calculate the Ultimate Answer
    private final int years;

    // The Answer to Life, the Universe, and Everything
    private final String ultimateAnswer;

    public ExampleBean(int years, String ultimateAnswer) {
        this.years = years;
        this.ultimateAnswer = ultimateAnswer;
    }
}
我们的解决方案是,一是根据类型来进行判断:
<bean id="exampleBean" class="examples.ExampleBean">
    <constructor-arg type="int" value="7500000"/>
    <constructor-arg type="java.lang.String" value="42"/>
</bean>
二是根据顺序进行指定:
<bean id="exampleBean" class="examples.ExampleBean">
    <constructor-arg index="0" value="7500000"/>
    <constructor-arg index="1" value="42"/>
</bean>
还可以
<bean id="exampleBean" class="examples.ExampleBean">
    <constructor-arg name="years" value="7500000"/>
    <constructor-arg name="ultimateAnswer" value="42"/>
</bean>
最后一种方法是:
public class ExampleBean {

    // Number of years to calculate the Ultimate Answer
    private final int years;

    // The Answer to Life, the Universe, and Everything
    private final String ultimateAnswer;

    @ConstructorProperties({"years", "ultimateAnswer"})
    public ExampleBean(int years, String ultimateAnswer) {
        this.years = years;
        this.ultimateAnswer = ultimateAnswer;
    }
}
基于setter的实现比较简单。
public class PetStoreService {
    private AccountDao accountDao;
    private ItemDao itemDao;
    private String owner;
    private int version;

    public int getVersion() {
        return version;
    }

    public void setVersion(int version) {
        this.version = version;
    }
}

<?xml version="1.0" encoding="UTF-8"?>
<beans xmlns="http://www.springframework.org/schema/beans"
       xmlns:xsi="http://www.w3.org/2001/XMLSchema-instance"
       xsi:schemaLocation="http://www.springframework.org/schema/beans
           http://www.springframework.org/schema/beans/spring-beans.xsd">

    <bean id="petStore"
          class="org.litespring.service.v2.PetStoreService">

        <property name="accountDao" ref="accountDao"/>
        <property name="itemDao" ref="itemDao"/>
        <property name="owner" value="hjs"/>
        <property name="version" value="2"/>
    </bean>

    <bean id="accountDao" class="org.litespring.dao.v2.AccountDao">
    </bean>

    <bean id="itemDao" class="org.litespring.dao.v2.ItemDao">
    </bean>

</beans>
总结下,依赖的处理过程。
- 通过配置元数据来创建管理Bean的ApplicationContext容器。其中配置元数据可以基于xml,Java代码和注解。
- 对于每个Bean来说,其依赖通过配置文件,构造函数的参数等提供;
- 每个配置或者构造函数的参数都是值或者引用;
- 值都要转换成实际的类型,如int,long,String,boolean等;
循环依赖是一个很重要的话题。
Xml可以使用p命名空间和c命名空间进行简化。如p相当于property:
<beans xmlns="http://www.springframework.org/schema/beans"
    xmlns:xsi="http://www.w3.org/2001/XMLSchema-instance"
    xmlns:p="http://www.springframework.org/schema/p"
    xsi:schemaLocation="http://www.springframework.org/schema/beans
        https://www.springframework.org/schema/beans/spring-beans.xsd">

    <bean name="classic" class="com.example.ExampleBean">
        <property name="email" value="someone@somewhere.com"/>
    </bean>

    <bean name="p-namespace" class="com.example.ExampleBean"
        p:email="someone@somewhere.com"/>
</beans>
c相当于constructor-arg:
<beans xmlns="http://www.springframework.org/schema/beans"
    xmlns:xsi="http://www.w3.org/2001/XMLSchema-instance"
    xmlns:c="http://www.springframework.org/schema/c"
    xsi:schemaLocation="http://www.springframework.org/schema/beans
        https://www.springframework.org/schema/beans/spring-beans.xsd">

    <bean id="beanTwo" class="x.y.ThingTwo"/>
    <bean id="beanThree" class="x.y.ThingThree"/>

    <!-- traditional declaration with optional argument names -->
    <bean id="beanOne" class="x.y.ThingOne">
        <constructor-arg name="thingTwo" ref="beanTwo"/>
        <constructor-arg name="thingThree" ref="beanThree"/>
        <constructor-arg name="email" value="something@somewhere.com"/>
    </bean>

    <!-- c-namespace declaration with argument names -->
    <bean id="beanOne" class="x.y.ThingOne" c:thingTwo-ref="beanTwo"
        c:thingThree-ref="beanThree" c:email="something@somewhere.com"/>

</beans>
注意区分depends-on和ref:
- ref:用来表示2个Bean之间的强依赖关系,如一个Bean是另外一个Bean的属性;
- depends-on:非直接的依赖关系;
<bean id="beanOne" class="ExampleBean" depends-on="manager"/>
<bean id="manager" class="ManagerBean" />
2.1.4 Bean的作用域
| Scope | Description |
|---|---|
| singleton | (Default) Scopes a single bean definition to a single object instance for each Spring IoC container. |
| prototype | Scopes a single bean definition to any number of object instances. |
| request | Scopes a single bean definition to the lifecycle of a single HTTP request. That is, each HTTP request has its own instance of a bean created off the back of a single bean definition. Only valid in the context of a web-aware Spring ApplicationContext. |
| session | Scopes a single bean definition to the lifecycle of an HTTP Session. Only valid in the context of a web-aware Spring ApplicationContext. |
| application | Scopes a single bean definition to the lifecycle of a ServletContext. Only valid in the context of a web-aware Spring ApplicationContext. |
| websocket | Scopes a single bean definition to the lifecycle of a WebSocket. Only valid in the context of a web-aware Spring ApplicationContext. |
2.1.4 定制Bean的特性
Spring为我们提供了3个接口来进行定制:
第一个是生命周期回调:Lifecycle Callbacks。
对于初始化回调,我们有以下三种方法(且有优先级):
- 方法上标注@PostConstruct注解
- 我们可以实现InitializingBean,覆写afterPropertiesSet方法
- xml中指定init-method,指定init方法
对于销毁方法:
- 方法上标注@PreDestroy注解
- 实现DisposableBean接口,覆写destroy()方法
- xml中指定destroy-method,指定destroy方法
第二个是ApplicationContextAware 和 BeanNameAware。
以及其他的Aware接口:
| Name | Injected Dependency | Explained in… |
|---|---|---|
ApplicationContextAware |
Declaring ApplicationContext. |
ApplicationContextAware and BeanNameAware |
ApplicationEventPublisherAware |
Event publisher of the enclosing ApplicationContext. |
Additional Capabilities of the ApplicationContext |
BeanClassLoaderAware |
Class loader used to load the bean classes. | Instantiating Beans |
BeanFactoryAware |
Declaring BeanFactory. |
The BeanFactory |
BeanNameAware |
Name of the declaring bean. | ApplicationContextAware and BeanNameAware |
LoadTimeWeaverAware |
Defined weaver for processing class definition at load time. | Load-time Weaving with AspectJ in the Spring Framework |
MessageSourceAware |
Configured strategy for resolving messages (with support for parametrization and internationalization). | Additional Capabilities of the ApplicationContext |
NotificationPublisherAware |
Spring JMX notification publisher. | Notifications |
ResourceLoaderAware |
Configured loader for low-level access to resources. | Resources |
ServletConfigAware |
Current ServletConfig the container runs in. Valid only in a web-aware Spring ApplicationContext. |
Spring MVC |
ServletContextAware |
Current ServletContext the container runs in. Valid only in a web-aware Spring ApplicationContext. |
Spring MVC |
2.1.5 继承BeanDefinition
类似于模板模式的实现,可以简化配置:
<bean id="inheritedTestBean" abstract="true"
        class="org.springframework.beans.TestBean">
    <property name="name" value="parent"/>
    <property name="age" value="1"/>
</bean>

<bean id="inheritsWithDifferentClass"
        class="org.springframework.beans.DerivedTestBean"
        parent="inheritedTestBean" init-method="initialize">
    <property name="name" value="override"/>
    <!-- the age property value of 1 will be inherited from parent -->
</bean>
2.1.5 容器扩展点
- 使用
BeanPostProcessor来自定义Bean
public interface BeanPostProcessor {
  // bean初始化前
	Object postProcessBeforeInitialization(Object bean, String beanName) throws BeansException;
	// bean初始化后
	Object postProcessAfterInitialization(Object bean, String beanName) throws BeansException;
}
- 使用
BeanFactoryPostProcessor来自定义配置元数据
public interface BeanFactoryPostProcessor {
  // 应用程序在Spring创建Bean对象前修改BeanDefinition。
  // 比如:Bean属性配置的类型转换,占位符的替换等。
	void postProcessBeanFactory(ConfigurableListableBeanFactory beanFactory) throws BeansException;
}
- 通过
FactoryBean来自定义Bean的实例化逻辑
package org.springframework.beans.factory;
 // 实现该接口,可以自定义Bean的创建逻辑
public interface FactoryBean<T> {
  // 该工厂创建对象的实例
	T getObject() throws Exception;

	Class<?> getObjectType();
  // getObject()方法返回对象的类型
	boolean isSingleton();
}
2.2 资源管理
2.3 校验、数据绑定、类型转换
2.3.1 校验
校验不应该被放在业务逻辑中。Spring提供了Validator接口。
public interface Validator {
  // 校验目标类能否校验
	boolean supports(Class<?> clazz);
	// 校验目标对象,并将校验失败的内容输出至 Errors 对象
	void validate(Object target, Errors errors);
}
举个例子:
public class UserLoginValidator implements Validator {

      private static final int MINIMUM_PASSWORD_LENGTH = 6;

      public boolean supports(Class clazz) {
         return UserLogin.class.isAssignableFrom(clazz);
      }

      public void validate(Object target, Errors errors) {
         ValidationUtils.rejectIfEmptyOrWhitespace(errors, "userName", "field.required");
         ValidationUtils.rejectIfEmptyOrWhitespace(errors, "password", "field.required");
         UserLogin login = (UserLogin) target;
         if (login.getPassword() != null
               && login.getPassword().trim().length() < MINIMUM_PASSWORD_LENGTH) {
            errors.rejectValue("password", "field.min.length",
                  new Object[]{Integer.valueOf(MINIMUM_PASSWORD_LENGTH)},
                  "The password must be at least [" + MINIMUM_PASSWORD_LENGTH + "] characters in length.");
         }
      }
   }
需要注意
- ValidationUtils
- Errors:数据绑定和校验错误收集接口
- 核心方法
- reject 方法(重载):收集错误文案
- rejectValue 方法(重载):收集对象字段中的错误文案
- 核心方法
2.3.2 数据绑定
- 数据绑定:DataBinder
- Web参数绑定:WebDataBinder
2.3.3 类型转换
/**
 * A converter converts a source object of type S to a target of type T.
 * Implementations of this interface are thread-safe and can be shared.
 *
 * <p>Implementations may additionally implement {@link ConditionalConverter}.
 *
 * @author Keith Donald
 * @since 3.0
 * @param <S> The source type
 * @param <T> The target type
 */
public interface Converter<S, T> {

	/**
	 * Convert the source of type S to target type T.
	 * @param source the source object to convert, which must be an instance of S (never {@code null})
	 * @return the converted object, which must be an instance of T (potentially {@code null})
	 * @throws IllegalArgumentException if the source could not be converted to the desired target type
	 */
	T convert(S source);

}
2.4 AOP
AOP是OOP的一种补充。
这个可以参考这里。
2.5 附录
3. 测试
mock objects, TestContext framework, Spring MVC Test,
WebTestClient
TODO。
4. 数据存储
transactions, DAO support, JDBC, ORM, Marshalling XML.
本部分介绍的是数据存储层和业务层的交互。
4.1 事务管理
Spring提供的事务管理的优势如下:
- 事务管理可以跨不同的API,如JTA,JDBC和JPA等;
- 支持声明式事务;
- 使用起来比JTA等复杂的API简单;
4.1.1 Spring事务支持模型的优势
TODO
4.2 支持DAO
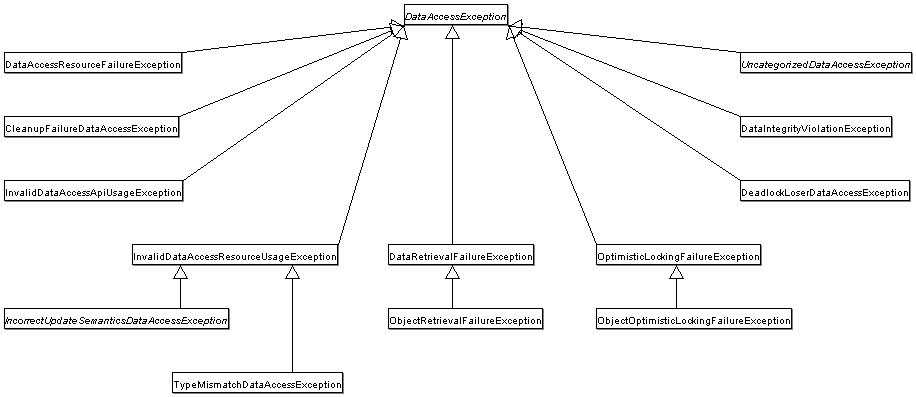
目标是在不同的技术之间(JDBC, Hibernate,或者 JPA)快速切换。同时具备完善的异常体系。
4.2.1 统一的异常层次体系

4.2.2 使用注解配置DAO对象
@Repository
public class HibernateMovieFinder implements MovieFinder {

    private SessionFactory sessionFactory;

    @Autowired
    public void setSessionFactory(SessionFactory sessionFactory) {
        this.sessionFactory = sessionFactory;
    }

    // ...
}
4.3 JDBC
4.3.1 JDBC数据库的访问方法
-
JdbcTemplate
-
int rowCount = this.jdbcTemplate.queryForObject("select count(*) from t_actor", Integer.class);

int countOfActorsNamedJoe = this.jdbcTemplate.queryForObject(
        "select count(*) from t_actor where first_name = ?", Integer.class, "Joe");

Actor actor = jdbcTemplate.queryForObject(
        "select first_name, last_name from t_actor where id = ?",
        (resultSet, rowNum) -> {
            Actor newActor = new Actor();
            newActor.setFirstName(resultSet.getString("first_name"));
            newActor.setLastName(resultSet.getString("last_name"));
            return newActor;
        },
        1212L);

this.jdbcTemplate.update(
        "insert into t_actor (first_name, last_name) values (?, ?)",
        "Leonor", "Watling");

this.jdbcTemplate.update(
        "update t_actor set last_name = ? where id = ?",
        "Banjo", 5276L);
-
-
SimpleJdbcInsert


